Extract beautiful workflow diagrams from your code annotations

putior (PUT + Input + Output + R) is an R package that extracts structured annotations from source code files and creates beautiful Mermaid flowchart diagrams. Perfect for documenting data pipelines, workflows, and understanding complex codebases.
📑 Table of Contents
- Key Features
- TL;DR
- Installation
- Quick Start
- Common Data Science Pattern
- Visualization Examples
- Using the Diagrams
- Visualization Modes
- Theme System
- Customization Options
- Annotation Reference
- Advanced Usage
- Advanced Features
- API Reference
- Self-Documentation
- Contributing
- License
- How putior Compares
- Acknowledgments
🌟 Key Features
- Simple annotations - Add structured comments to your existing code
- Beautiful diagrams - Generate professional Mermaid flowcharts
-
File flow tracking - Automatically connects scripts based on input/output files
- Multiple themes - 9 built-in themes including GitHub-optimized and colorblind-safe (viridis family)
- Cross-language support - Works with 30+ file types including R, Python, SQL, JavaScript, TypeScript, Go, Rust, and more
- Flexible output - Console, file, or clipboard export
- Customizable styling - Control colors, direction, and node shapes
New to putior? Check out the Cheatsheet (PDF) for a quick visual reference!
⚡ TL;DR
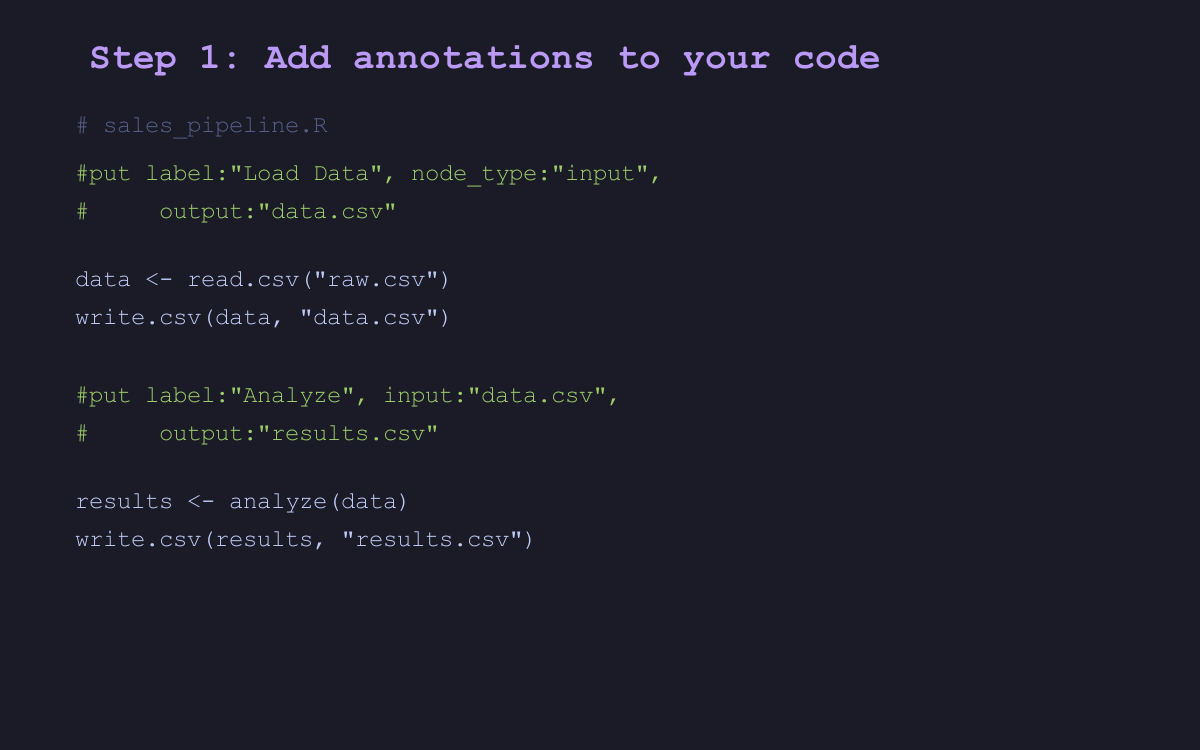
# 1. Add annotation to your script
# put label:"Load Data", output:"clean.csv"
# 2. Generate diagram
library(putior)
put_diagram(put("./"))See result
flowchart TD
node1[Load Data]
artifact_clean_csv[(clean.csv)]
node1 --> artifact_clean_csv
classDef processStyle fill:#ede9fe,stroke:#7c3aed,stroke-width:2px,color:#5b21b6
class node1 processStyle
classDef artifactStyle fill:#f3f4f6,stroke:#6b7280,stroke-width:1px,color:#374151
class artifact_clean_csv artifactStyle
📦 Installation
# Install from CRAN (recommended)
install.packages("putior")
# Or install from GitHub (development version)
remotes::install_github("pjt222/putior")
# Or with renv
renv::install("putior") # CRAN version
renv::install("pjt222/putior") # GitHub version
# Or with pak (faster)
pak::pkg_install("putior") # CRAN version
pak::pkg_install("pjt222/putior") # GitHub version🚀 Quick Start
Step 1: Annotate Your Code
Add # put comments to describe each step in your workflow. Start simple:
[!TIP] One line is enough! The simplest annotation is
# put label:"My Step"- ID, type, and output are auto-generated.
Minimal annotation (just a label):
# put label:"Load Data"That’s it! putior will: - Auto-generate a unique ID for the node - Default node_type to "process" - Default output to the current filename (for connecting scripts)
Add more detail as needed:
# put label:"Fetch Sales Data", node_type:"input", output:"sales_data.csv"Complete example with two files:
01_fetch_data.R
# put label:"Fetch Sales Data", node_type:"input", output:"sales_data.csv"
# Your actual code
library(readr)
sales_data <- fetch_sales_from_api()
write_csv(sales_data, "sales_data.csv")02_clean_data.py
Step 2: Extract and Visualize
library(putior)
# Extract workflow from your scripts
workflow <- put("./scripts/")
# Generate diagram
put_diagram(workflow)Result:
flowchart TD
fetch_sales([Fetch Sales Data])
clean_data[Clean and Process]
%% Connections
fetch_sales --> clean_data
%% Styling
classDef inputStyle fill:#dbeafe,stroke:#2563eb,stroke-width:2px,color:#1e40af
class fetch_sales inputStyle
classDef processStyle fill:#ede9fe,stroke:#7c3aed,stroke-width:2px,color:#5b21b6
class clean_data processStyle
📈 Common Data Science Pattern
Modular Workflow with source()
The most common data science pattern: modularize functions into separate scripts and orchestrate them in a main workflow:
utils.R - Utility functions
# put label:"Data Utilities", node_type:"input"
load_and_clean <- function(file) {
data <- read.csv(file)
data[complete.cases(data), ]
}
validate_data <- function(data) {
stopifnot(nrow(data) > 0)
return(data)
}analysis.R - Analysis functions
# put label:"Statistical Analysis", input:"utils.R"
perform_analysis <- function(data) {
# Uses utility functions from utils.R
cleaned <- validate_data(data)
summary(cleaned)
}main.R - Workflow orchestrator
# put label:"Main Analysis Pipeline", input:"utils.R,analysis.R", output:"results.csv"
source("utils.R") # Load utility functions
source("analysis.R") # Load analysis functions
# Execute the pipeline
data <- load_and_clean("raw_data.csv")
results <- perform_analysis(data)
write.csv(results, "results.csv")Generated Workflow (Simple):
flowchart TD
utils([Data Utilities])
analysis[Statistical Analysis]
main[Main Analysis Pipeline]
%% Connections
utils --> analysis
utils --> main
analysis --> main
%% Styling
classDef inputStyle fill:#dbeafe,stroke:#2563eb,stroke-width:2px,color:#1e40af
class utils inputStyle
classDef processStyle fill:#ede9fe,stroke:#7c3aed,stroke-width:2px,color:#5b21b6
class analysis processStyle
class main processStyle
Generated Workflow (With Data Artifacts):
# Show complete data flow including all files
put_diagram(workflow, show_artifacts = TRUE)flowchart TD
utils([Data Utilities])
analysis[Statistical Analysis]
main[Main Analysis Pipeline]
artifact_results_csv[(results.csv)]
%% Connections
utils --> analysis
utils --> main
analysis --> main
main --> artifact_results_csv
%% Styling
classDef inputStyle fill:#dbeafe,stroke:#2563eb,stroke-width:2px,color:#1e40af
class utils inputStyle
classDef processStyle fill:#ede9fe,stroke:#7c3aed,stroke-width:2px,color:#5b21b6
class analysis processStyle
class main processStyle
classDef artifactStyle fill:#f3f4f6,stroke:#6b7280,stroke-width:1px,color:#374151
class artifact_results_csv artifactStyle
This pattern clearly shows: - Function modules (utils.R, analysis.R) are sourced into the main script - Dependencies between modules (analysis depends on utils)
- Complete data flow with artifacts showing terminal outputs like results.csv - Two visualization modes: simple (script connections only) vs. complete (with data artifacts)
📊 Visualization Examples
Basic Workflow
# Simple three-step process
workflow <- put("./data_pipeline/")
put_diagram(workflow)Advanced Data Science Pipeline
Here’s how putior handles a complete data science workflow:
File Structure:
data_pipeline/
├── 01_fetch_sales.R # Fetch sales data
├── 02_fetch_customers.R # Fetch customer data
├── 03_clean_sales.py # Clean sales data
├── 04_merge_data.R # Merge datasets
├── 05_analyze.py # Statistical analysis
└── 06_report.R # Generate final report
Generated Workflow:
flowchart TD
fetch_sales([Fetch Sales Data])
fetch_customers([Fetch Customer Data])
clean_sales[Clean Sales Data]
merge_data[Merge Datasets]
analyze[Statistical Analysis]
report[[Generate Final Report]]
%% Connections
fetch_sales --> clean_sales
fetch_customers --> merge_data
clean_sales --> merge_data
merge_data --> analyze
analyze --> report
%% Styling
classDef inputStyle fill:#dbeafe,stroke:#2563eb,stroke-width:2px,color:#1e40af
class fetch_sales inputStyle
class fetch_customers inputStyle
classDef processStyle fill:#ede9fe,stroke:#7c3aed,stroke-width:2px,color:#5b21b6
class clean_sales processStyle
class merge_data processStyle
class analyze processStyle
classDef outputStyle fill:#dcfce7,stroke:#16a34a,stroke-width:2px,color:#15803d
class report outputStyle
📋 Using the Diagrams
Embedding in Documentation
The generated Mermaid code works perfectly in:
- GitHub README files (native Mermaid support)
- GitLab documentation
- Notion pages
- Obsidian notes
- Jupyter notebooks (with extensions)
- Sphinx documentation (with plugins)
- Any Markdown renderer with Mermaid support
Saving and Sharing
# Save to markdown file
put_diagram(workflow, output = "file", file = "workflow.md")
# Copy to clipboard for pasting
put_diagram(workflow, output = "clipboard")
# Include title for documentation
put_diagram(workflow, output = "file", file = "docs/pipeline.md",
title = "Data Processing Pipeline")🔧 Visualization Modes
putior offers two visualization modes to suit different needs:
Workflow Boundaries Demo
First, let’s see how workflow boundaries enhance pipeline visualization:
Pipeline with Boundaries (Default):
# Complete ETL pipeline with clear start/end boundaries
put_diagram(workflow, show_workflow_boundaries = TRUE)flowchart TD
pipeline_start([Data Pipeline Start])
extract_data[Extract Raw Data]
transform_data[Transform Data]
pipeline_end([Pipeline Complete])
%% Connections
pipeline_start --> extract_data
extract_data --> transform_data
transform_data --> pipeline_end
%% Styling
classDef processStyle fill:#ede9fe,stroke:#7c3aed,stroke-width:2px,color:#5b21b6
class extract_data processStyle
class transform_data processStyle
classDef startStyle fill:#fef3c7,stroke:#d97706,stroke-width:3px,color:#92400e
class pipeline_start startStyle
classDef endStyle fill:#dcfce7,stroke:#16a34a,stroke-width:3px,color:#15803d
class pipeline_end endStyle
Same Pipeline without Boundaries:
# Clean diagram without workflow control styling
put_diagram(workflow, show_workflow_boundaries = FALSE)flowchart TD
pipeline_start([Data Pipeline Start])
extract_data[Extract Raw Data]
transform_data[Transform Data]
pipeline_end([Pipeline Complete])
%% Connections
pipeline_start --> extract_data
extract_data --> transform_data
transform_data --> pipeline_end
%% Styling
classDef processStyle fill:#ede9fe,stroke:#7c3aed,stroke-width:2px,color:#5b21b6
class extract_data processStyle
class transform_data processStyle
Simple Mode (Default)
Shows only script-to-script connections - perfect for understanding code dependencies:
put_diagram(workflow) # Default: simple modeUse when: - Documenting code architecture - Showing function dependencies - Clean, simple workflow diagrams
Artifact Mode (Complete Data Flow)
Shows all data files as nodes - provides complete picture of data flow including terminal outputs:
put_diagram(workflow, show_artifacts = TRUE)Use when: - Documenting data pipelines - Tracking data lineage - Showing complete input/output flow - Understanding data dependencies
Comparison Example
Simple Mode:
flowchart TD
load[Load Data] --> process[Process Data]
process --> analyze[Analyze]
Artifact Mode:
flowchart TD
load[Load Data]
raw_data[(raw_data.csv)]
process[Process Data]
clean_data[(clean_data.csv)]
analyze[Analyze]
results[(results.json)]
load --> raw_data
raw_data --> process
process --> clean_data
clean_data --> analyze
analyze --> results
Key Differences
| Mode | Shows | Best For |
|---|---|---|
| Simple | Script connections only | Code architecture, dependencies |
| Artifact | Scripts + data files | Data pipelines, complete data flow |
File Labeling
Add file names to connections for extra clarity:
# Show file names on arrows
put_diagram(workflow, show_artifacts = TRUE, show_files = TRUE)🎨 Theme System
putior provides 9 carefully designed themes optimized for different environments:
# Get list of available themes
get_diagram_themes()Theme Overview
Standard Themes
| Theme | Best For | Description |
|---|---|---|
light |
Documentation sites, tutorials | Default light theme with bright colors |
dark |
Dark mode apps, terminals | Dark theme with muted colors |
auto |
GitHub README files | GitHub-adaptive theme that works in both modes |
minimal |
Business reports, presentations | Grayscale professional theme |
github |
GitHub README (recommended) | Optimized for maximum GitHub compatibility |
Colorblind-Safe Themes (Viridis Family)
| Theme | Best For | Palette |
|---|---|---|
viridis |
General accessibility | Purple → Blue → Green → Yellow |
magma |
Print, high contrast | Purple → Red → Yellow |
plasma |
Presentations | Purple → Pink → Orange → Yellow |
cividis |
Maximum accessibility | Blue → Gray → Yellow (red-green safe) |
All viridis themes are perceptually uniform and tested for deuteranopia, protanopia, and tritanopia.
Theme Examples
Light Theme
put_diagram(workflow, theme = "light")flowchart TD
fetch_data([Fetch API Data])
clean_data[Clean and Validate]
generate_report[[Generate Final Report]]
%% Connections
fetch_data --> clean_data
clean_data --> generate_report
%% Styling
classDef inputStyle fill:#e1f5fe,stroke:#01579b,stroke-width:2px,color:#000000
class fetch_data inputStyle
classDef processStyle fill:#f3e5f5,stroke:#4a148c,stroke-width:2px,color:#000000
class clean_data processStyle
classDef outputStyle fill:#e8f5e8,stroke:#1b5e20,stroke-width:2px,color:#000000
class generate_report outputStyle
Dark Theme
put_diagram(workflow, theme = "dark")flowchart TD
fetch_data([Fetch API Data])
clean_data[Clean and Validate]
generate_report[[Generate Final Report]]
%% Connections
fetch_data --> clean_data
clean_data --> generate_report
%% Styling
classDef inputStyle fill:#1a237e,stroke:#3f51b5,stroke-width:2px,color:#ffffff
class fetch_data inputStyle
classDef processStyle fill:#4a148c,stroke:#9c27b0,stroke-width:2px,color:#ffffff
class clean_data processStyle
classDef outputStyle fill:#1b5e20,stroke:#4caf50,stroke-width:2px,color:#ffffff
class generate_report outputStyle
Auto Theme (GitHub Adaptive)
put_diagram(workflow, theme = "auto") # Recommended for GitHub!flowchart TD
fetch_data([Fetch API Data])
clean_data[Clean and Validate]
generate_report[[Generate Final Report]]
%% Connections
fetch_data --> clean_data
clean_data --> generate_report
%% Styling
classDef inputStyle fill:#3b82f6,stroke:#1d4ed8,stroke-width:2px,color:#ffffff
class fetch_data inputStyle
classDef processStyle fill:#8b5cf6,stroke:#6d28d9,stroke-width:2px,color:#ffffff
class clean_data processStyle
classDef outputStyle fill:#10b981,stroke:#047857,stroke-width:2px,color:#ffffff
class generate_report outputStyle
GitHub Theme (Maximum Compatibility)
put_diagram(workflow, theme = "github") # Best for GitHub READMEflowchart TD
fetch_data([Fetch API Data])
clean_data[Clean and Validate]
generate_report[[Generate Final Report]]
%% Connections
fetch_data --> clean_data
clean_data --> generate_report
%% Styling
classDef inputStyle fill:#dbeafe,stroke:#2563eb,stroke-width:2px,color:#1e40af
class fetch_data inputStyle
classDef processStyle fill:#ede9fe,stroke:#7c3aed,stroke-width:2px,color:#5b21b6
class clean_data processStyle
classDef outputStyle fill:#dcfce7,stroke:#16a34a,stroke-width:2px,color:#15803d
class generate_report outputStyle
Minimal Theme
put_diagram(workflow, theme = "minimal") # Professional documentsflowchart TD
fetch_data([Fetch API Data])
clean_data[Clean and Validate]
generate_report[[Generate Final Report]]
%% Connections
fetch_data --> clean_data
clean_data --> generate_report
%% Styling
classDef inputStyle fill:#f8fafc,stroke:#64748b,stroke-width:1px,color:#1e293b
class fetch_data inputStyle
classDef processStyle fill:#f1f5f9,stroke:#64748b,stroke-width:1px,color:#1e293b
class clean_data processStyle
classDef outputStyle fill:#f8fafc,stroke:#64748b,stroke-width:1px,color:#1e293b
class generate_report outputStyle
When to Use Each Theme
| Theme | Use Case | Environment |
|---|---|---|
light |
Documentation sites, tutorials | Light backgrounds |
dark |
Dark mode apps, terminals | Dark backgrounds |
auto |
GitHub README files | Adapts automatically |
github |
GitHub README (recommended) | Maximum compatibility |
minimal |
Business reports, presentations | Print-friendly |
viridis |
Accessibility (recommended) | Colorblind-safe |
cividis |
Red-green colorblindness | Maximum accessibility |
Pro Tips
-
For GitHub: Use
theme = "github"for maximum compatibility, ortheme = "auto"for adaptive colors -
For Documentation: Use
theme = "light"ortheme = "dark"to match your site -
For Reports: Use
theme = "minimal"for professional, print-friendly diagrams - For Demos: Light theme usually shows colors best in presentations
-
For Accessibility: Use
theme = "viridis"ortheme = "cividis"for colorblind-safe diagrams
Theme Usage Examples
# For GitHub README (recommended)
put_diagram(workflow, theme = "github")
# For GitHub README (adaptive)
put_diagram(workflow, theme = "auto")
# For dark documentation sites
put_diagram(workflow, theme = "dark", direction = "LR")
# For professional reports
put_diagram(workflow, theme = "minimal", output = "file", file = "report.md")
# For colorblind-safe diagrams
put_diagram(workflow, theme = "viridis") # General accessibility
put_diagram(workflow, theme = "cividis") # Red-green colorblindness
# Custom palette (override individual node type colors)
my_theme <- put_theme(base = "dark", input = c(fill = "#1a1a2e", stroke = "#00ff88"))
put_diagram(workflow, palette = my_theme)
# Save all themes for comparison
themes <- c("light", "dark", "auto", "github", "minimal",
"viridis", "magma", "plasma", "cividis")
for(theme in themes) {
put_diagram(workflow,
theme = theme,
output = "file",
file = paste0("workflow_", theme, ".md"),
title = paste("Workflow -", stringr::str_to_title(theme), "Theme"))
}🔧 Customization Options
Flow Direction
put_diagram(workflow, direction = "TD") # Top to bottom (default)
put_diagram(workflow, direction = "LR") # Left to right
put_diagram(workflow, direction = "BT") # Bottom to top
put_diagram(workflow, direction = "RL") # Right to leftNode Labels
put_diagram(workflow, node_labels = "name") # Show node IDs
put_diagram(workflow, node_labels = "label") # Show descriptions (default)
put_diagram(workflow, node_labels = "both") # Show name: descriptionFile Connections
# Show file names on arrows
put_diagram(workflow, show_files = TRUE)
# Clean arrows without file names
put_diagram(workflow, show_files = FALSE)Styling Control
# Include colored styling (default)
put_diagram(workflow, style_nodes = TRUE)
# Plain diagram without colors
put_diagram(workflow, style_nodes = FALSE)
# Control workflow boundary styling
put_diagram(workflow, show_workflow_boundaries = TRUE) # Special start/end styling (default)
put_diagram(workflow, show_workflow_boundaries = FALSE) # Regular node stylingWorkflow Boundaries
# Enable workflow boundaries (default) - start/end get special styling
put_diagram(workflow, show_workflow_boundaries = TRUE)
# Disable workflow boundaries - start/end render as regular nodes
put_diagram(workflow, show_workflow_boundaries = FALSE)Output Options
# Console output (default)
put_diagram(workflow)
# Save to markdown file
put_diagram(workflow, output = "file", file = "my_workflow.md")
# Copy to clipboard for pasting
put_diagram(workflow, output = "clipboard")📝 Annotation Reference
Defaults and Auto-Detection
putior is designed to work with minimal configuration. Here’s what happens automatically:
| Field | If Omitted | Behavior |
|---|---|---|
id |
Auto-generated UUID | Unique identifier like "a1b2c3d4-e5f6..."
|
label |
None | Recommended for readability |
node_type |
"process" |
Most common type for data transformation |
output |
Current filename | Enables script-to-script connections |
Minimal valid annotation:
# put label:"My Step"
# That's all you need to get started!Progressively add detail:
# put label:"My Step" # Minimal
# put label:"My Step", node_type:"input" # + type
# put label:"My Step", node_type:"input", output:"data.csv" # + output
# put id:"step1", label:"My Step", node_type:"input", output:"data.csv" # FullBasic Syntax
All PUT annotations follow this format:
# put property1:"value1", property2:"value2", property3:"value3"Flexible Syntax Options (All Valid)
# put id:"node_id", label:"Description" # Standard format (matches logo)
#put id:"node_id", label:"Description" # Also valid (no space)
# put| id:"node_id", label:"Description" # Pipe separator
# put: id:"node_id", label:"Description" # Colon separatorAnnotations
| Annotation | Description | Example | Required |
|---|---|---|---|
id |
Unique identifier for the node (auto-generated if omitted) |
"fetch_data", "clean_sales"
|
Optional* |
label |
Human-readable description |
"Fetch Sales Data", "Clean and Process"
|
Recommended |
*Note: If id is omitted, a UUID will be automatically generated. If you provide an empty id (e.g., id:""), you’ll get a validation warning.
Optional Annotations
| Annotation | Description | Example | Default |
|---|---|---|---|
node_type |
Visual shape of the node |
"input", "process", "output", "decision", "start", "end"
|
"process" |
input |
Input files (comma-separated) | "raw_data.csv, config.json" |
None |
output |
Output files (comma-separated) | "processed_data.csv, summary.txt" |
Current file name* |
*Note: If output is omitted, it defaults to the name of the file containing the annotation. This ensures nodes can be connected in workflows.
Node Types and Shapes
putior uses a data-centric approach with workflow boundaries as special control elements:
Data Processing Nodes: - "input" - Data sources, APIs, file readers → Stadium shape ([text]) - "process" - Data transformation, analysis → Rectangle [text]
- "output" - Final results, reports, exports → Subroutine [[text]] - "decision" - Conditional logic, branching → Diamond text
Workflow Control Nodes: - "start" - Workflow entry point → Stadium shape with orange styling - "end" - Workflow termination → Stadium shape with green styling
Workflow Boundaries
Control the visualization of workflow start/end points with show_workflow_boundaries:
# Special workflow boundary styling (default)
put_diagram(workflow, show_workflow_boundaries = TRUE)
# Regular nodes without special workflow styling
put_diagram(workflow, show_workflow_boundaries = FALSE)With boundaries enabled (default): - node_type:"start" gets distinctive orange styling with thicker borders - node_type:"end" gets distinctive green styling with thicker borders
With boundaries disabled: - Start/end nodes render as regular stadium shapes without special colors
Example Annotations
R Scripts:
# put id:"load_sales_data", label:"Load Sales Data from API", node_type:"input", output:"raw_sales.csv, metadata.json"
# put id:"validate_data", label:"Validate and Clean Data", node_type:"process", input:"raw_sales.csv", output:"clean_sales.csv"
# put id:"generate_report", label:"Generate Executive Summary", node_type:"output", input:"clean_sales.csv, metadata.json", output:"executive_summary.pdf"Python Scripts:
# put id:"collect_data", label:"Collect Raw Data", node_type:"input", output:"raw_data.csv"
# put id:"train_model", label:"Train ML Model", node_type:"process", input:"features.csv", output:"model.pkl"
# put id:"predict", label:"Generate Predictions", node_type:"output", input:"model.pkl, test_data.csv", output:"predictions.csv"SQL Scripts:
--put id:"load_customers", label:"Load Customer Data", node_type:"input", output:"customers"
SELECT * FROM raw_customers WHERE active = 1;
--put id:"aggregate_sales", label:"Aggregate Sales", input:"customers", output:"sales_summary"
SELECT customer_id, SUM(amount) FROM orders GROUP BY customer_id;JavaScript/TypeScript:
//put id:"fetch_api", label:"Fetch API Data", node_type:"input", output:"api_data.json"
const data = await fetch('/api/data').then(r => r.json());
//put id:"process_data", label:"Process JSON", input:"api_data.json", output:"processed.json"
const processed = transformData(data);MATLAB:
%put id:"load_matrix", label:"Load Data Matrix", node_type:"input", output:"matrix_data"
data = load('experiment.mat');
%put id:"analyze", label:"Statistical Analysis", input:"matrix_data", output:"results.mat"
results = analyze(data);Multiple Annotations Per File:
# analysis.R
# put id:"create_summary", label:"Calculate Summary Stats", node_type:"process", input:"processed_data.csv", output:"summary_stats.json"
# put id:"create_report", label:"Generate Sales Report", node_type:"output", input:"processed_data.csv", output:"sales_report.html"
# Your R code here...Workflow Entry and Exit Points:
# main_workflow.R
# put id:"workflow_start", label:"Start Analysis Pipeline", node_type:"start", output:"config.json"
# put id:"workflow_end", label:"Pipeline Complete", node_type:"end", input:"final_report.pdf"Workflow Boundary Examples:
# Complete pipeline with boundaries
# put id:"pipeline_start", label:"Data Pipeline Start", node_type:"start", output:"raw_config.json"
# put id:"extract_data", label:"Extract Raw Data", node_type:"process", input:"raw_config.json", output:"raw_data.csv"
# put id:"transform_data", label:"Transform Data", node_type:"process", input:"raw_data.csv", output:"clean_data.csv"
# put id:"pipeline_end", label:"Pipeline Complete", node_type:"end", input:"clean_data.csv"Generated Workflow with Boundaries:
flowchart TD
pipeline_start([Data Pipeline Start])
extract_data[Extract Raw Data]
transform_data[Transform Data]
pipeline_end([Pipeline Complete])
pipeline_start --> extract_data
extract_data --> transform_data
transform_data --> pipeline_end
classDef startStyle fill:#e8f5e8,stroke:#2e7d32,stroke-width:3px,color:#1b5e20
classDef processStyle fill:#ede9fe,stroke:#7c3aed,stroke-width:2px,color:#5b21b6
classDef endStyle fill:#ffebee,stroke:#c62828,stroke-width:3px,color:#b71c1c
class pipeline_start startStyle
class extract_data,transform_data processStyle
class pipeline_end endStyle
Supported File Types
putior automatically detects and processes 30+ file types, with language-specific comment syntax:
| Comment Style | Languages | Extensions |
|---|---|---|
# put |
R, Python, Shell, Julia, Ruby, Perl, YAML, TOML, Dockerfile, Makefile |
.R, .py, .sh, .jl, .rb, .pl, .yaml, .yml, .toml, Dockerfile, Makefile
|
-- put |
SQL, Lua, Haskell |
.sql, .lua, .hs
|
// put |
JavaScript, TypeScript, C, C++, Java, Go, Rust, Swift, Kotlin, C#, PHP, Scala, WGSL |
.js, .ts, .jsx, .tsx, .c, .cpp, .java, .go, .rs, .swift, .kt, .cs, .php, .scala, .wgsl
|
% put |
MATLAB, LaTeX |
.m, .tex
|
Languages using // also support PUT annotations inside block comments (/* */ and /** */), using * put as the line prefix.
Unknown extensions default to # prefix.
🛠️ Advanced Usage
Directory Scanning
# Scan current directory
workflow <- put(".")
# Scan specific directory
workflow <- put("./src/")
# Recursive scanning (include subdirectories)
workflow <- put("./project/", recursive = TRUE)
# Custom file patterns
workflow <- put("./analysis/", pattern = "\\.(R|py)$")
# Exclude files matching regex patterns
workflow <- put("./src/", exclude = c("test", "deprecated"))
workflow <- put_auto("./", exclude = c("vendor", "fixture"))
# Single file
workflow <- put("./script.R")Debugging and Validation
# Include line numbers for debugging
workflow <- put("./src/", include_line_numbers = TRUE)
# Disable validation warnings
workflow <- put("./src/", validate = FALSE)
# Test annotation syntax
is_valid_put_annotation('# put id:"test", label:"Test Node"') # TRUE
is_valid_put_annotation("# put invalid syntax") # FALSEUUID Auto-Generation
When you omit the id field, putior automatically generates a unique UUID:
# Annotations without explicit IDs
# put label:"Load Data", node_type:"input", output:"data.csv"
# put label:"Process Data", node_type:"process", input:"data.csv"
# Extract workflow - IDs will be auto-generated
workflow <- put("./")
print(workflow$id)
# [1] "a1b2c3d4-e5f6-7890-abcd-ef1234567890"
# [2] "b2c3d4e5-f6a7-8901-bcde-f23456789012"This feature is perfect for: - Quick prototyping without worrying about unique IDs - Temporary workflows where IDs don’t matter - Ensuring uniqueness across large codebases
Note: If you provide an empty id (e.g., id:""), you’ll get a validation warning.
Tracking Source Relationships
When you have a main script that sources other scripts, annotate them to show the sourcing relationships:
# main.R - sources other scripts
# put label:"Main Workflow", input:"utils.R,analysis.R", output:"results.csv"
source("utils.R") # Reading utils.R into main.R
source("analysis.R") # Reading analysis.R into main.R
# utils.R - sourced by main.R
# put label:"Utility Functions", node_type:"input"
# output defaults to "utils.R"
# analysis.R - sourced by main.R, depends on utils.R
# put label:"Analysis Functions", input:"utils.R"
# output defaults to "analysis.R"This creates a diagram showing: - utils.R → main.R (sourced into) - analysis.R → main.R (sourced into) - utils.R → analysis.R (dependency)
Variable References with .internal Extension
Track in-memory variables and objects alongside persistent files:
# Script 1: Create and save data
# put output:'my_data.internal, my_data.RData'
my_data <- process_data()
save(my_data, file = 'my_data.RData')
# Script 2: Load data and create new variables
# put input:'my_data.RData', output:'results.internal, summary.csv'
load('my_data.RData') # Load the persistent file
results <- analyze(my_data) # Create new in-memory variable
write.csv(results, 'summary.csv')Key Concepts: - .internal variables: Exist only during script execution (outputs only) - Persistent files: Enable data flow between scripts (inputs/outputs) - Connected workflows: Use file-based dependencies, not variable references
Try the complete example:
source(system.file("examples", "variable-reference-example.R", package = "putior"))🚀 Advanced Features
putior includes powerful features for automation, interactivity, and debugging that go beyond basic annotations.
Auto-Annotation System
Automatically detect workflow elements from code analysis without writing annotations:
# Auto-detect inputs/outputs from code patterns
workflow <- put_auto("./src/")
put_diagram(workflow)
# Generate annotation comments for your files (like roxygen2 skeleton)
put_generate("./src/") # Print to console
put_generate("./src/", output = "clipboard") # Copy to clipboard
# Combine manual annotations with auto-detected
workflow <- put_merge("./src/", merge_strategy = "supplement")Use cases: Instantly visualize unfamiliar codebases, generate annotation templates, supplement manual annotations with auto-detected I/O.
Interactive Diagrams
Make your diagrams more useful with source file info and clickable nodes:
# Show which file each node comes from
put_diagram(workflow, show_source_info = TRUE)
# Group nodes by source file
put_diagram(workflow, show_source_info = TRUE, source_info_style = "subgraph")
# Enable clickable nodes (opens source in VS Code)
put_diagram(workflow, enable_clicks = TRUE)
# Use different editors
put_diagram(workflow, enable_clicks = TRUE, click_protocol = "rstudio")
put_diagram(workflow, enable_clicks = TRUE, click_protocol = "file")Debugging with Logging
Enable structured logging to debug annotation parsing and diagram generation:
# Set log level for detailed output
set_putior_log_level("DEBUG") # Most verbose
set_putior_log_level("INFO") # Progress updates
set_putior_log_level("WARN") # Default - warnings only
# Or per-call override
workflow <- put("./src/", log_level = "DEBUG")
put_diagram(workflow, log_level = "INFO")Requires optional logger package: install.packages("logger")
Detection Pattern Customization
View the patterns putior uses to auto-detect inputs and outputs:
# Get all R detection patterns
patterns <- get_detection_patterns("r")
# Get only input patterns for Python
input_patterns <- get_detection_patterns("python", type = "input")
# Supported languages with auto-detection (18 languages, 900+ patterns):
# r, python, sql, shell, julia, javascript, typescript, go, rust,
# java, c, cpp, matlab, ruby, lua, wgsl, dockerfile, makefile
list_supported_languages(detection_only = TRUE)Interactive Sandbox
Try putior without writing any files using the built-in Shiny app:
# Launch interactive sandbox (requires shiny package)
run_sandbox()The sandbox lets you: - Paste or type annotated code - Simulate multiple files - Customize diagram settings in real-time - Export generated Mermaid code
📚 API Reference
Quick reference for all exported functions:
Core Workflow:
| Function | Purpose | Example |
|---|---|---|
put() |
Extract annotations from files | workflow <- put("./src/") |
put_diagram() |
Generate Mermaid diagram | put_diagram(workflow) |
put_auto() |
Auto-detect workflow from code | put_auto("./src/") |
put_generate() |
Generate annotation comments | put_generate("./src/") |
put_merge() |
Combine manual + auto annotations | put_merge("./src/") |
put_theme() |
Create custom color palette | put_theme(base = "dark", input = c(fill = "#1a1a2e")) |
run_sandbox() |
Launch interactive Shiny app | run_sandbox() |
Reference and Utilities:
| Function | Purpose | Example |
|---|---|---|
get_detection_patterns() |
View/customize detection patterns | get_detection_patterns("r") |
list_supported_languages() |
List supported languages | list_supported_languages() |
get_comment_prefix() |
Get comment prefix for extension |
get_comment_prefix("sql") → "--"
|
get_supported_extensions() |
List all supported extensions | get_supported_extensions() |
get_diagram_themes() |
List available themes | get_diagram_themes() |
ext_to_language() |
Extension to language name |
ext_to_language("rs") → "rust"
|
set_putior_log_level() |
Configure logging verbosity | set_putior_log_level("DEBUG") |
is_valid_put_annotation() |
Validate annotation syntax | is_valid_put_annotation("# put ...") |
split_file_list() |
Parse comma-separated files | split_file_list("a.csv, b.csv") |
putior_help() |
Quick reference help | putior_help() |
putior_skills() |
AI assistant documentation | putior_skills() |
Integration (MCP/ACP):
| Function | Purpose | Example |
|---|---|---|
putior_mcp_server() |
Start MCP server for AI assistants | putior_mcp_server() |
putior_mcp_tools() |
Get MCP tool definitions | putior_mcp_tools() |
putior_acp_server() |
Start ACP server for agent-to-agent | putior_acp_server() |
putior_acp_manifest() |
Get ACP agent manifest | putior_acp_manifest() |
For detailed documentation, see: - Function help: ?put, ?put_diagram, ?put_auto - pkgdown site - Quick Start - First diagram in 2 minutes - Annotation Guide - Complete syntax reference
🔄 Self-Documentation: putior Documents Itself!
As a demonstration of putior’s capabilities, we’ve added PUT annotations to putior’s own source code. This creates a beautiful visualization of how the package works internally:
# Extract putior's own workflow
workflow <- put("./R/")
put_diagram(workflow, theme = "github", title = "putior Package Internals",
show_workflow_boundaries = TRUE)putior’s Own Workflow:
---
title: putior Package Internals
---
flowchart TD
diagram_gen[Generate Mermaid Diagram]
styling[Apply Theme Styling]
node_defs[Create Node Definitions]
connections[Generate Node Connections]
output_handler([Output Final Diagram])
put_entry([Entry Point - Scan Files])
process_file[Process Single File]
validate[Validate Annotations]
parser[Parse Annotation Syntax]
convert_df[Convert to Data Frame]
%% Connections
put_entry --> diagram_gen
convert_df --> diagram_gen
node_defs --> styling
put_entry --> node_defs
convert_df --> node_defs
node_defs --> connections
diagram_gen --> output_handler
process_file --> validate
process_file --> parser
parser --> convert_df
%% Styling
classDef processStyle fill:#ede9fe,stroke:#7c3aed,stroke-width:2px,color:#5b21b6
class diagram_gen processStyle
class styling processStyle
class node_defs processStyle
class connections processStyle
class process_file processStyle
class validate processStyle
class parser processStyle
class convert_df processStyle
classDef startStyle fill:#fef3c7,stroke:#d97706,stroke-width:3px,color:#92400e
class put_entry startStyle
classDef endStyle fill:#dcfce7,stroke:#16a34a,stroke-width:3px,color:#15803d
class output_handler endStyle
This diagram is auto-generated by running put("./R/") on putior’s own annotated source code — a real demonstration of the package in action.
To see the complete data flow with intermediate files, run:
put_diagram(workflow, show_artifacts = TRUE, theme = "github")🤝 Contributing
Contributions welcome! Please open an issue or pull request on GitHub.
Development Setup:
📄 License
This project is licensed under the MIT License - see the LICENSE file for details.
📊 How putior Compares to Other R Packages
putior fills a unique niche in the R ecosystem by combining annotation-based workflow extraction with beautiful diagram generation:
| Package | Focus | Approach | Output | Best For |
|---|---|---|---|---|
| putior | Data workflow visualization | Code annotations | Mermaid diagrams | Pipeline documentation |
| CodeDepends | Code dependency analysis | Static analysis | Variable graphs | Understanding code structure |
| DiagrammeR | General diagramming | Manual diagram code | Interactive graphs | Custom diagrams |
| visNetwork | Interactive networks | Manual network definition | Interactive vis.js | Complex network exploration |
| dm | Database relationships | Schema analysis | ER diagrams | Database documentation |
| flowchart | Study flow diagrams | Dataframe input | ggplot2 charts | Clinical trials |
Key Advantages of putior
- 📝 Annotation-Based: Workflow documentation lives in your code comments
- 🔄 Multi-Language: Works across R, Python, SQL, Shell, and Julia
- 📁 File Flow Tracking: Automatically connects scripts based on input/output files
- 🎨 Beautiful Output: GitHub-ready Mermaid diagrams with multiple themes
-
📦 Lightweight: Minimal dependencies (only requires
toolspackage) - 🔍 Two Views: Simple script connections + complete data artifact flow
Documentation vs Execution: putior and Pipeline Tools
A common question: “How does putior relate to targets/drake/Airflow?”
Key insight: putior documents workflows, while targets/drake/Airflow execute them. They’re complementary!
| Tool | Purpose | Relationship to putior |
|---|---|---|
| putior | Document & visualize workflows | - |
| targets | Execute R pipelines | putior can document targets pipelines |
| drake | Execute R pipelines (predecessor to targets) | putior can document drake plans |
| Airflow | Orchestrate complex DAGs | putior can document Airflow DAGs |
| Nextflow | Execute bioinformatics pipelines | putior can document Nextflow workflows |
Example: Using putior WITH targets
# _targets.R
# put label:"Load Raw Data", node_type:"input", output:"raw_data"
tar_target(raw_data, read_csv("data/sales.csv"))
# put label:"Clean Data", input:"raw_data", output:"clean_data"
tar_target(clean_data, clean_sales(raw_data))
# put label:"Generate Report", node_type:"output", input:"clean_data"
tar_target(report, render_report(clean_data))
# Document your targets pipeline
library(putior)
put_diagram(put("_targets.R"), title = "Sales Analysis Pipeline")This gives you: - targets: Handles caching, parallel execution, dependency tracking - putior: Creates visual documentation for README, wikis, onboarding
🙏 Acknowledgments
- Built with Mermaid for beautiful diagram generation
- Inspired by the need for better code documentation and workflow visualization
- Thanks to the R community for excellent development tooling
👥 Contributors
- Philipp Thoss (@pjt222) - Primary author and maintainer
- Claude (Anthropic) - Co-author on 38 commits, contributing to package development, documentation, and testing
Note: While GitHub’s contributor graph only displays primary commit authors, Claude’s contributions are properly attributed through Co-Authored-By tags in the commit messages. To see all contributions, use: git log --grep="Co-Authored-By: Claude"
🌟 Shoutout to Related R Packages
putior stands on the shoulders of giants in the R visualization and workflow ecosystem:
- CodeDepends by Duncan Temple Lang - pioneering work in R code dependency analysis
- targets by William Michael Landau - powerful pipeline toolkit for reproducible computation
- DiagrammeR by Richard Iannone - bringing beautiful graph visualization to R
- ggraph by Thomas Lin Pedersen - grammar of graphics for networks and trees
- visNetwork by Almende B.V. - interactive network visualization excellence
- networkD3 by Christopher Gandrud - D3.js network graphs in R
- dm by energie360° AG - relational data model visualization
- flowchart by Adrian Antico - participant flow diagrams
- igraph by Gábor Csárdi & Tamás Nepusz - the foundation of network analysis in R
Each of these packages excels in their domain, and putior complements them by focusing specifically on code workflow documentation through annotations.
Made with ❤️ for polyglot data science workflows across R, Python, Julia, SQL, JavaScript, Go, Rust, and 30+ languages